Admin Guide
Comprehensive guide for platform administrators to manage users, plans, subscriptions, and system settings.
On this page
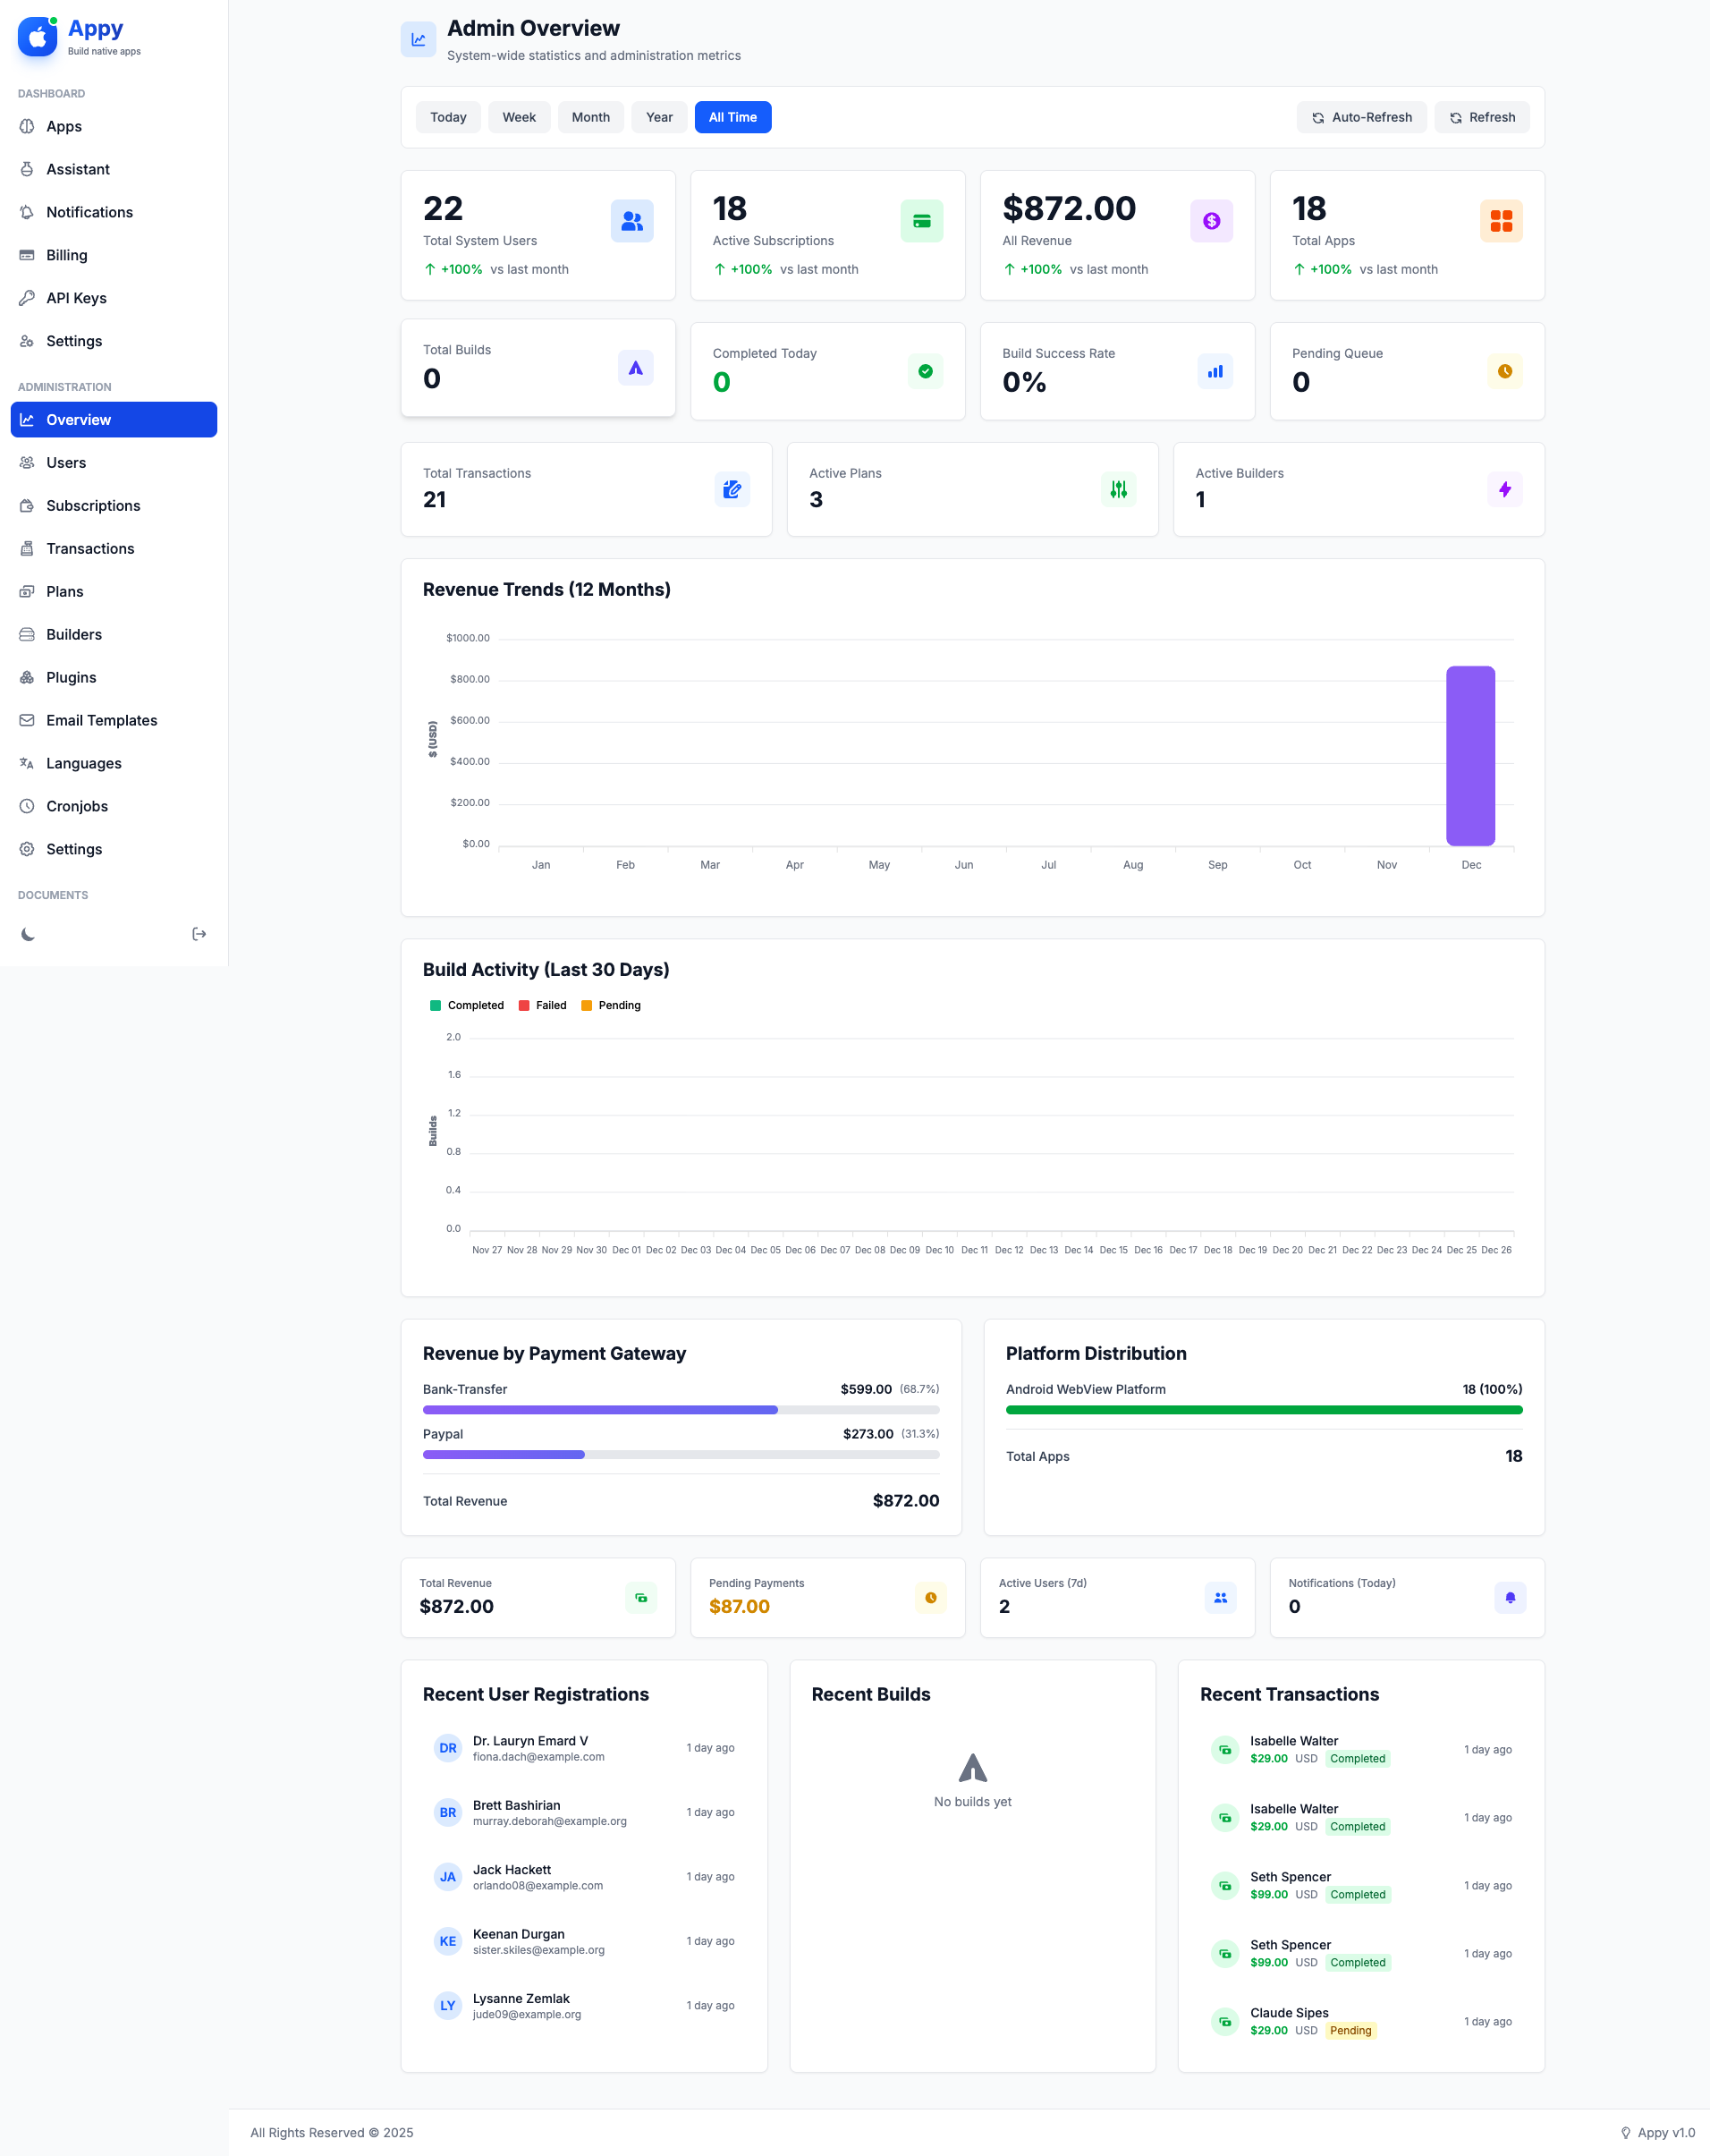
Admin Dashboard
The admin dashboard provides an overview of your platform's performance and key metrics.
Accessing the Admin Panel
To access admin features, you must be logged in with an admin account. Admin accounts are created during installation or can be promoted from the user management page.
Navigate to Admin > Overview to view:
- Total Users: Number of registered users
- Active Subscriptions: Users with active paid plans
- Total Revenue: Sum of all successful transactions
- Total Apps: Number of apps created across all users
- Recent Builds: Latest app builds and their status
- Revenue Chart: Monthly revenue trends
- Popular Plans: Most subscribed plans
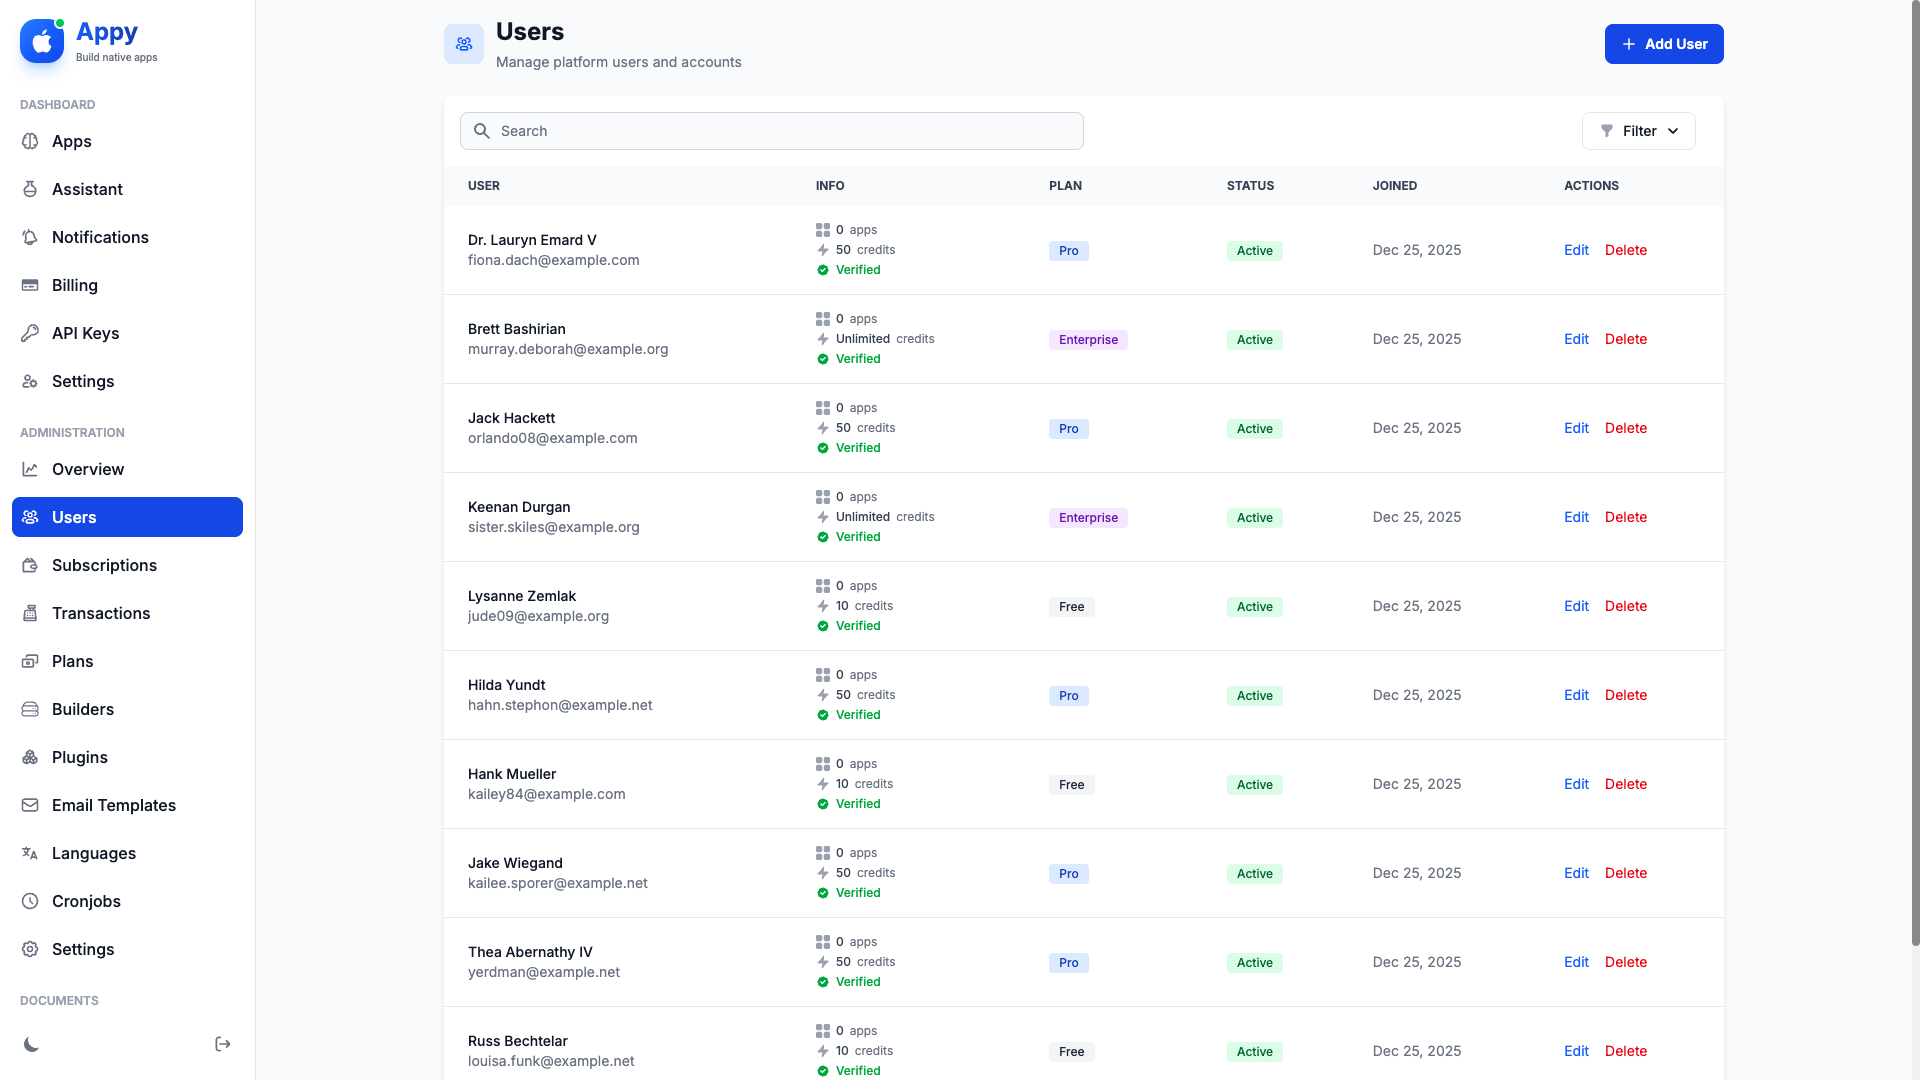
User Management
Manage all users on your platform from Admin > Users.
Viewing Users
The users table displays:
- User name and email
- Current subscription plan
- Account status (Active/Inactive)
- Role (Admin/User)
- Registration date
- Available build credits
Search and Filter
Use the search bar to find users by name or email. Filter by:
- Status: Active or Inactive users
- Role: Admins or regular users
- Plan: Users on specific subscription plans
Creating a New User
- Click Add New User
- Enter user details (name, email, password)
- Select a role (Admin or User)
- Choose a subscription plan
- Set account status (Active or Inactive)
- Click Create User
Editing Users
Click the edit icon next to any user to:
- Update personal information
- Change their subscription plan
- Promote to admin or demote to user
- Activate or deactivate their account
- Manually adjust build credits
- Reset their password
Deleting Users
Click the delete icon to remove a user. This will:
- Delete their account permanently
- Remove all their apps and builds
- Cancel their active subscription
Warning: Deleting a user cannot be undone. All their data will be permanently removed.
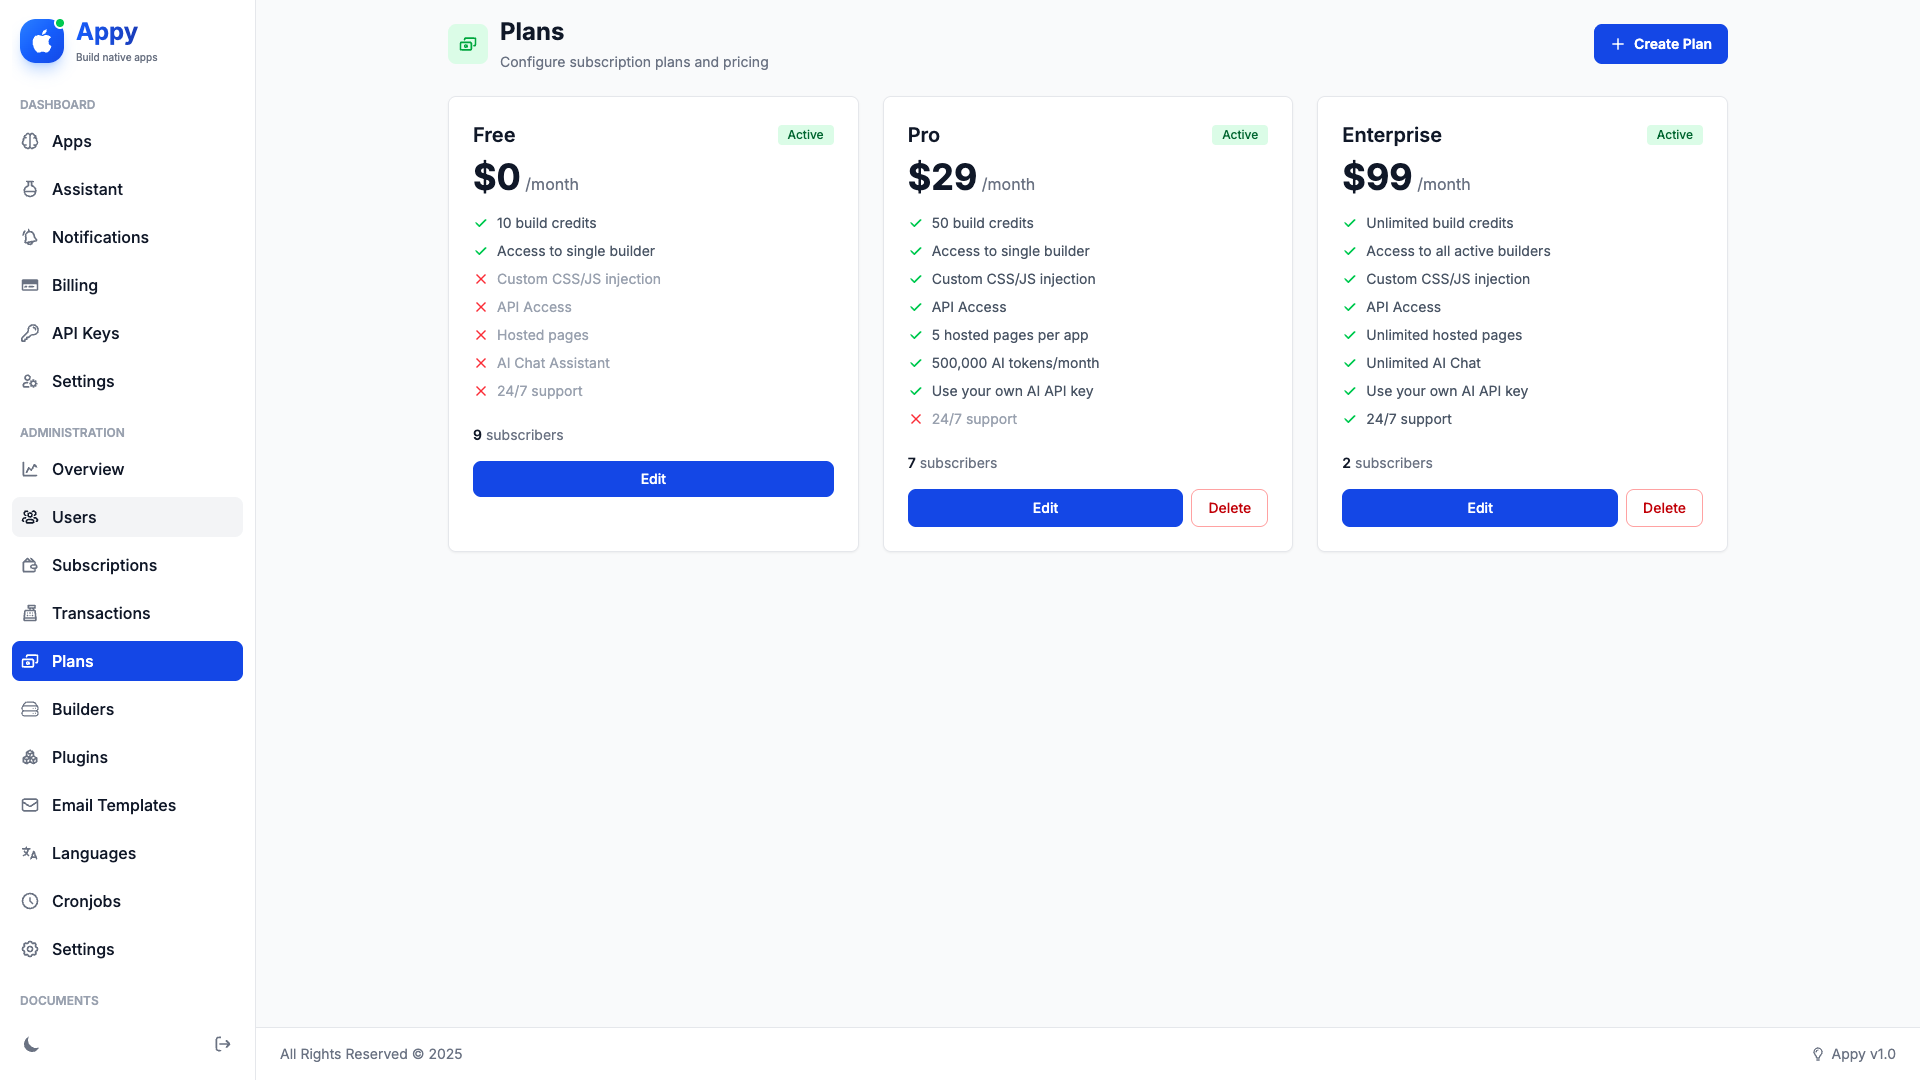
Plan Management
Create and manage subscription plans at Admin > Plans.
Default Plans
Appy comes with three default plans:
- Free: Limited features for trial users
- Pro: Full features for individual developers
- Enterprise: Advanced features for agencies
Creating a New Plan
- Click Create New Plan
- Enter plan details:
- Name: Plan name (e.g., "Starter", "Business")
- Price: Monthly price (0 for free plans)
- Currency: USD, EUR, etc.
- Billing Interval: Monthly or Yearly
- Status: Active or Inactive
- Configure features:
- Monthly Build Credits: Number of builds per month
- Can Use Custom Code: Allow HTML/CSS/JS injection
- Can Use Appetize: Enable browser preview
- Monthly Appetize Minutes: Preview time allocation
- Can Use API: Enable REST API access
- Allowed Builders: Restrict to specific build servers
- Add feature list (displayed to users):
- Enter features one per line
- Example: "Unlimited apps", "24/7 support"
- Click Create Plan
Editing Plans
You can edit plan details at any time. Changes affect:
- New subscribers: Immediately
- Existing subscribers: On next billing cycle (unless manually updated)
Setting Default Plan
Mark one plan as default by checking Is Default. New users are automatically assigned to this plan upon registration.
Deactivating Plans
Set status to Inactive to hide a plan from new subscriptions. Existing subscribers keep their plan until they change it.
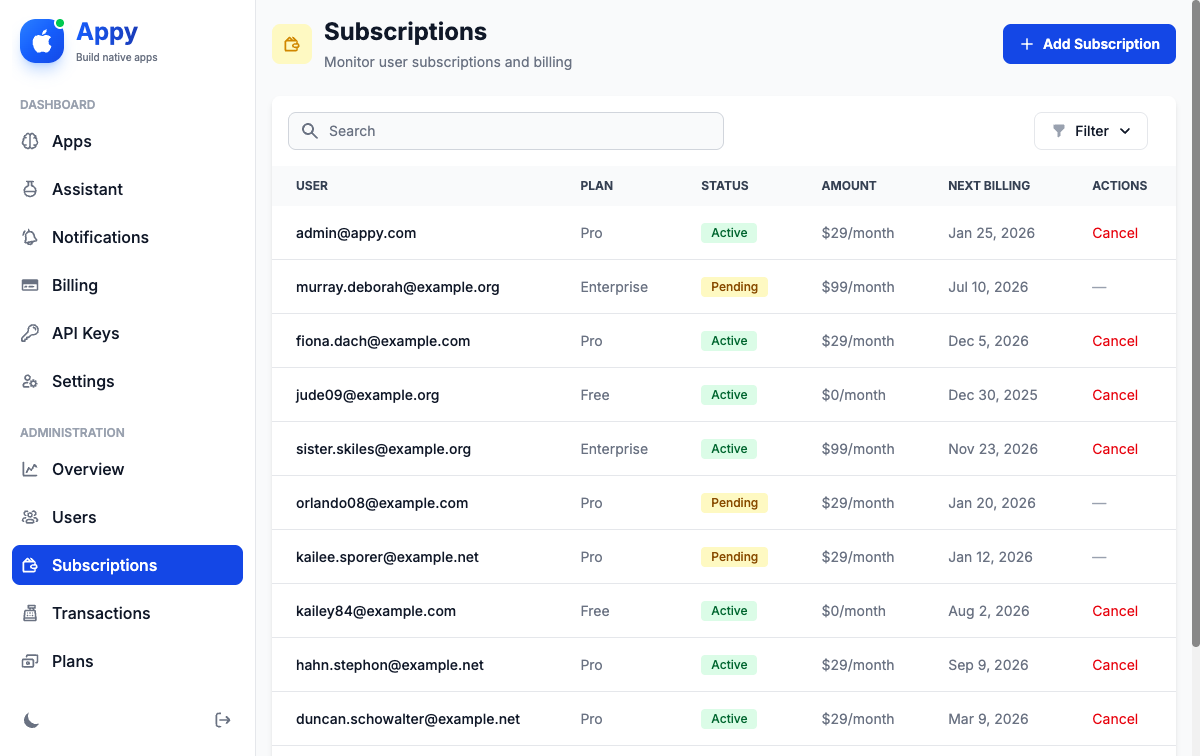
Subscription Management
Monitor and manage all subscriptions at Admin > Subscriptions.
Subscription Details
View comprehensive subscription information:
- User name and email
- Current plan
- Subscription status (Active, Pending, Expired, Canceled, Past Due)
- Amount and payment method
- Start date and renewal date
- External subscription ID (from payment gateway)
Filtering Subscriptions
Filter by:
- Status: Active, Expired, Canceled, etc.
- Plan: Specific subscription plan
- Payment Method: Stripe, PayPal, Razorpay, etc.
Manually Managing Subscriptions
As an admin, you can:
- Edit Subscription: Change plan, renewal date, or status
- Cancel Subscription: Immediately end a user's subscription
- Extend Subscription: Adjust renewal date to give extra time
- Refund: Issue refunds through your payment gateway dashboard
Note: Manual subscription changes won't affect the external subscription in payment gateways. Cancel in the payment gateway dashboard separately if needed.
Transaction History
View all payment transactions at Admin > Transactions. Each transaction includes:
- Transaction ID (internal and external)
- User and subscription information
- Amount and currency
- Payment status (Pending, Completed, Failed, Refunded)
- Payment method
- Transaction date
- Metadata (additional payment gateway data)
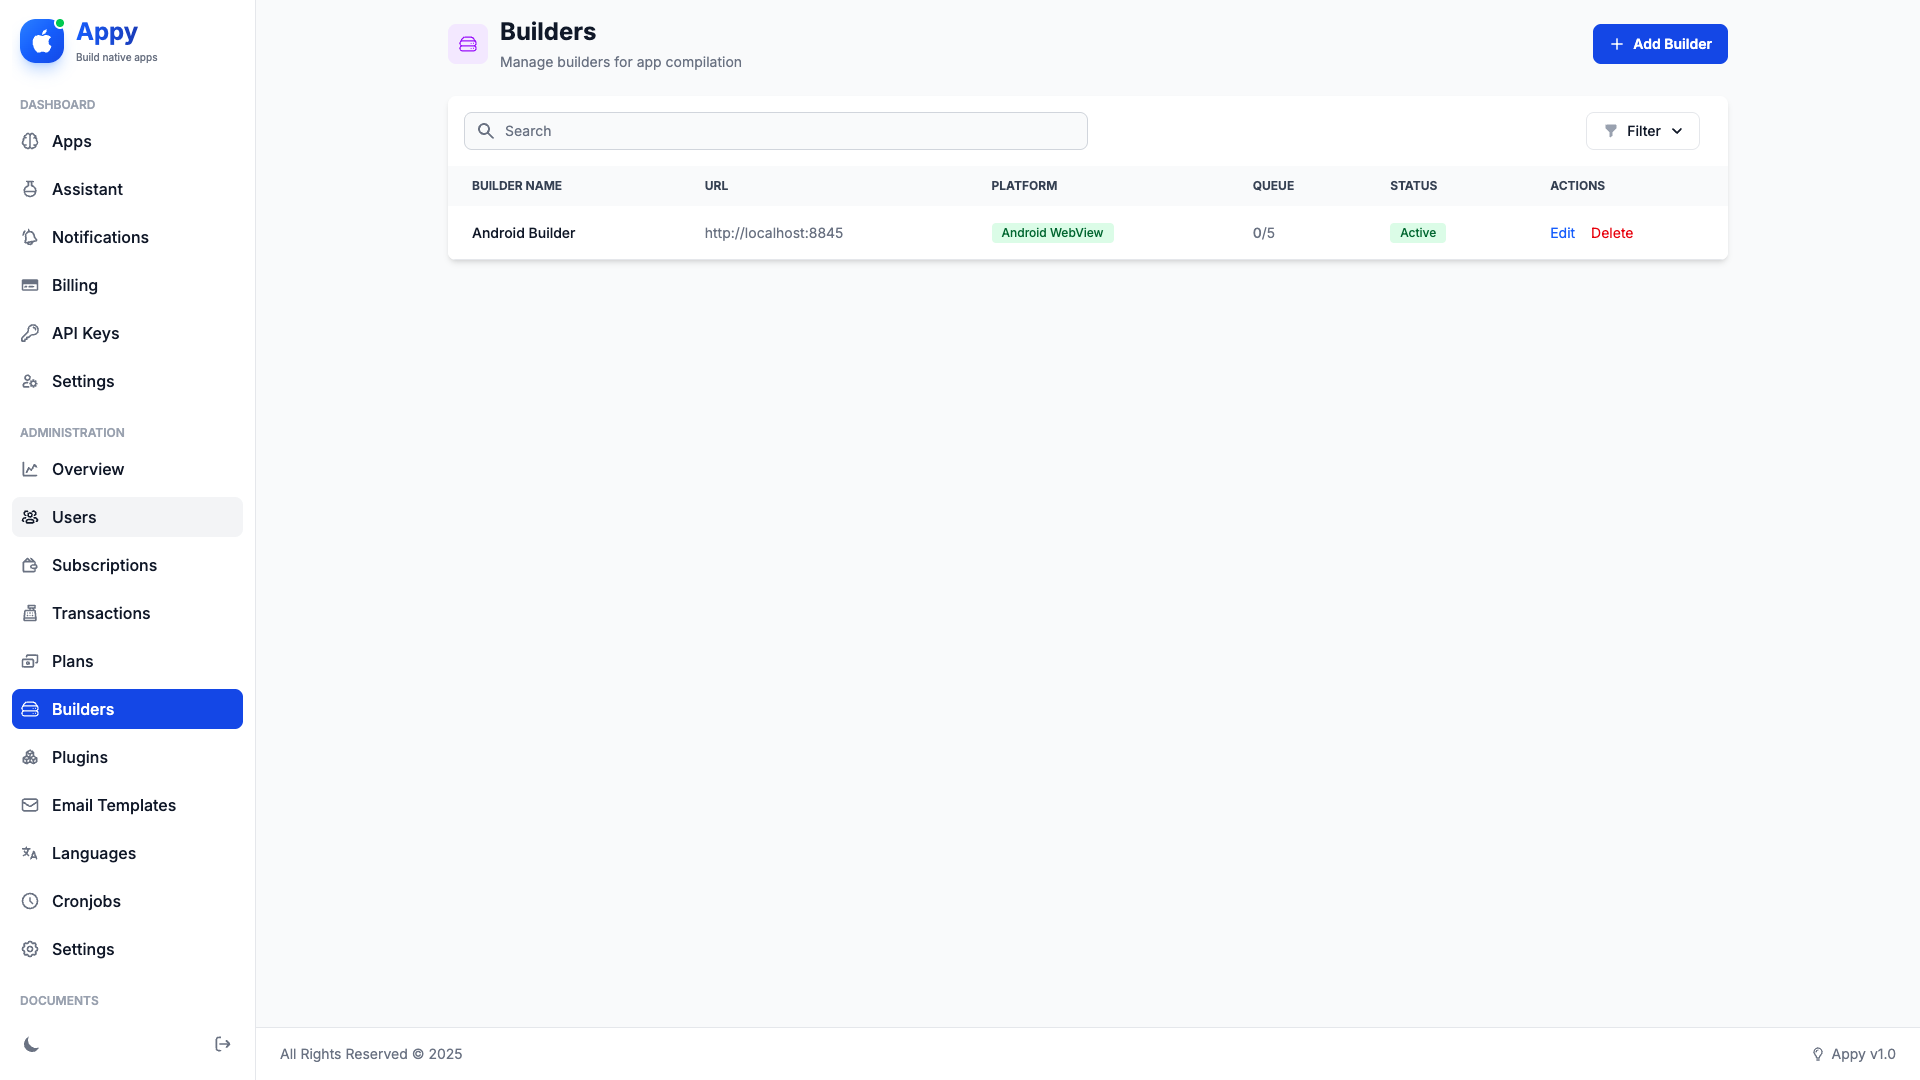
Builder Management
Manage distributed build servers at Admin > Builders.
What are Builders?
Builders are remote servers that compile Android APKs. You can set up multiple builders to handle builds in parallel and distribute load.
Builder Information
Each builder shows:
- Name: Builder identifier
- URL and Port: Builder server address
- Platform: Android (iOS coming soon)
- Status: Active, Inactive, or Maintenance
- Max Queue: Maximum concurrent builds
- Current Builds: Number of builds in progress
- Credit Cost: Credits deducted per build on this builder
- Total Builds Processed: Lifetime build count
- Last Triggered: Last build assignment time
Adding a Builder
- Set up a builder server (see builder documentation)
- Click Add New Builder
- Enter:
- Builder name
- Server URL (without http/https)
- Server port (usually 3000)
- Server key (authentication token)
- Platform (Android)
- Max queue size (recommended: 3-5)
- Credit cost per build
- Click Create Builder
Builder Status
- Active: Accepting new builds
- Inactive: Not accepting builds
- Maintenance: Temporarily paused for updates
Cron Jobs Setup
Appy uses Laravel's task scheduler for automated tasks. You must add a single cron entry to your server that runs every minute.
Setting Up the Cron Job
Connect to your server via SSH and open the crontab editor:
crontab -eAdd this line at the end of the file (replace the path with your actual installation path):
* * * * * cd /path/to/your/appy && php artisan schedule:run >> /dev/null 2>&1For example, if you installed Appy in /home/username/public_html:
* * * * * cd /home/username/public_html && php artisan schedule:run >> /dev/null 2>&1Important: Without this cron entry, builds won't be dispatched to builders, scheduled notifications won't be sent, and monthly credits won't reset.
Scheduled Tasks
The following tasks run automatically:
| Task | Frequency | Description |
|---|---|---|
| Trigger Builders | Every minute | Dispatches pending builds to available builders |
| Check Build Timeouts | Every 5 minutes | Marks stalled builds as failed after 30 minutes |
| Process Notifications | Every minute | Sends scheduled push notifications |
| Reset Monthly Credits | Monthly (1st) | Resets user build credits based on their plan |
| Manage Subscriptions | Daily | Handles subscription renewals and expirations |
| Prune Expired Builds | Daily | Removes old build artifacts to save storage |
| Cleanup Appetize | Daily | Cleans up expired Appetize preview sessions |
| Process Account Deletions | Daily | Executes scheduled account deletions after grace period |
| Prune Audit Logs | Daily | Removes old audit logs based on retention settings |
| Prune Data Exports | Daily | Cleans expired data export files |
Monitoring Cron Jobs
View cron job execution history at Admin > Cron Jobs. This page shows:
- Job Name: The scheduled task that ran
- Status: Success or failed
- Duration: How long the task took
- Last Run: When the task last executed
- Message: Output or error message
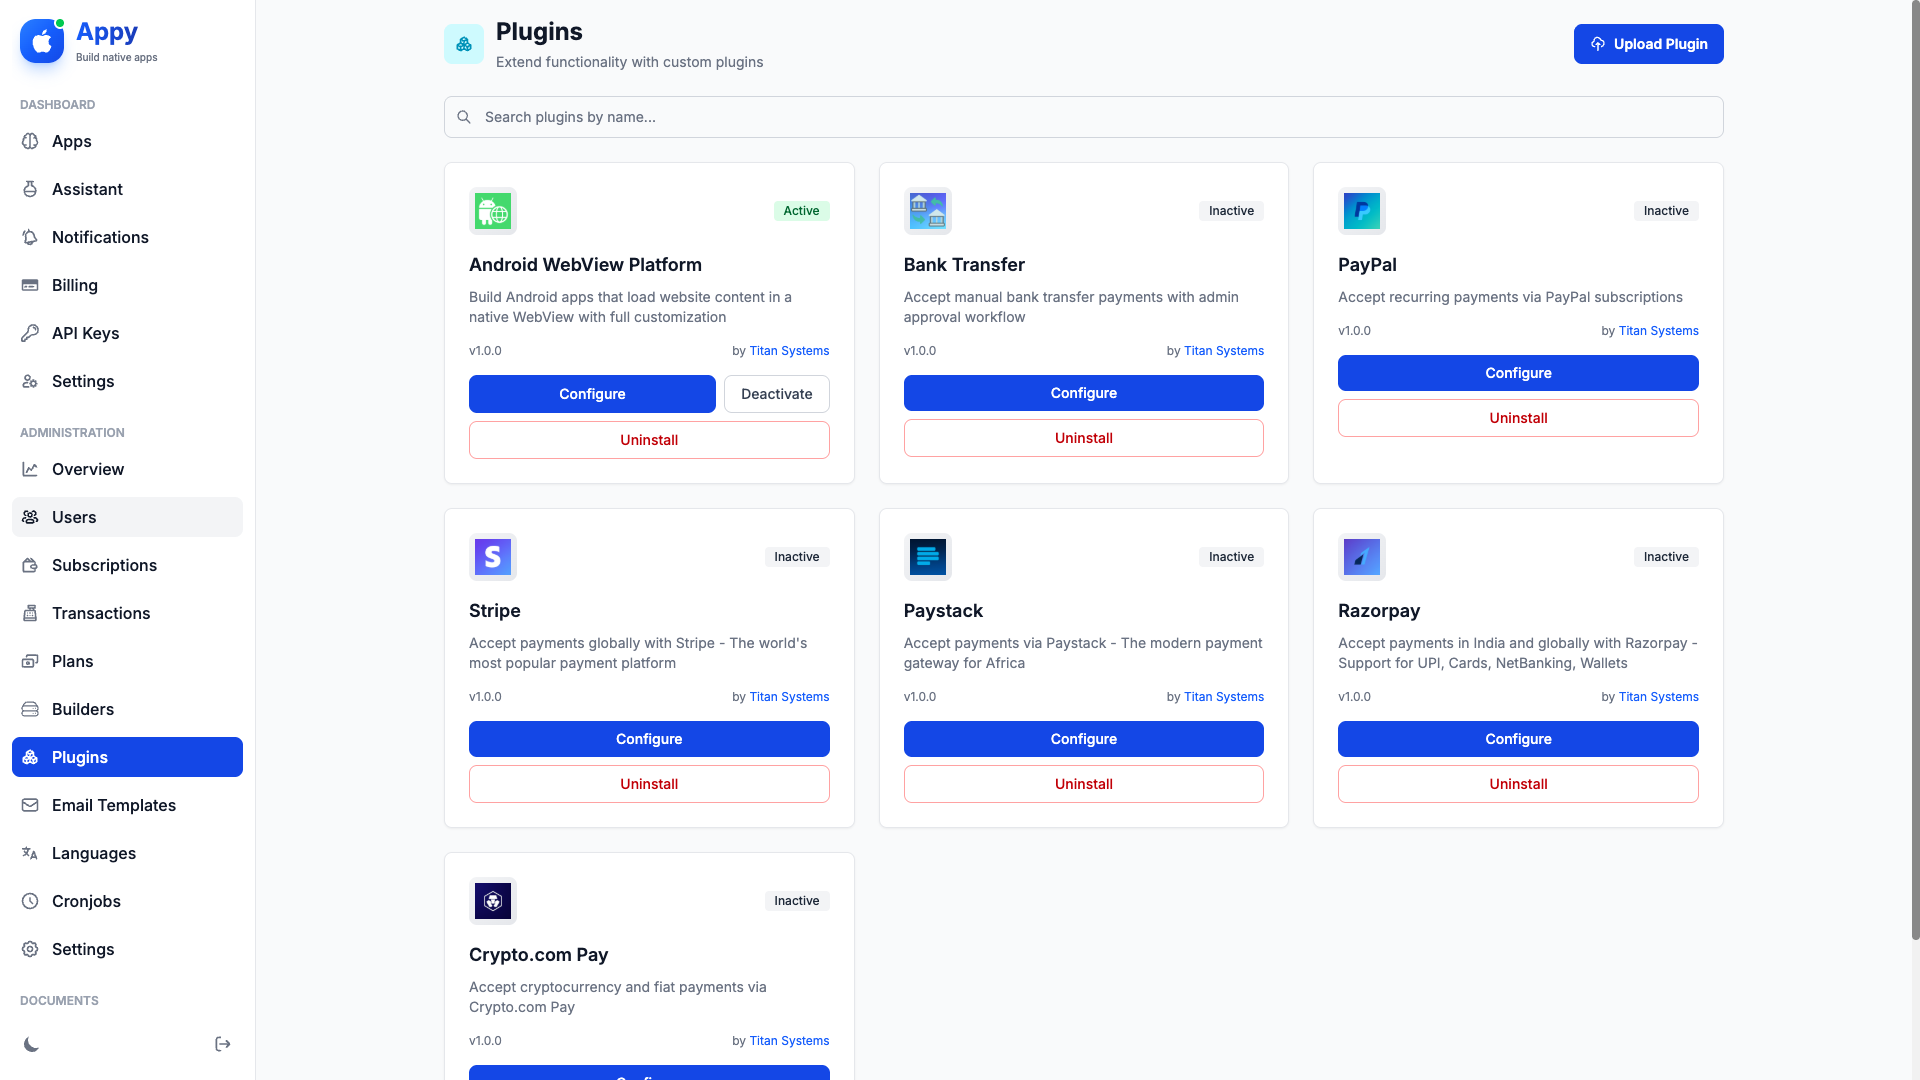
Plugin Management
Extend Appy's functionality with plugins at Admin > Plugins.
Plugin Types
- Payment Gateways: Stripe, PayPal, Razorpay, Paystack, Crypto.com Pay, Bank Transfer
- Platforms: Android WebView (more coming soon)
- Bridges: Connect to third-party platforms (future)
Installing Plugins
Default plugins are pre-installed. To add custom plugins:
- Click Upload Plugin
- Select a plugin ZIP file
- Click Install Plugin
- Configure the plugin settings
- Activate the plugin
Configuring Plugins
Click Configure on any plugin to set:
- Payment Gateways: API keys, webhook secrets, test mode
- Platforms: Build configuration, default settings
Activating/Deactivating Plugins
Use the toggle switch to enable or disable plugins. Deactivated plugins:
- Don't appear to users
- Can't be selected for new transactions or apps
- Keep existing data intact
Deleting Plugins
Click Delete to remove a plugin permanently. This will:
- Remove the plugin files
- Delete plugin database tables
- Remove plugin configurations
Tip: Always keep at least one payment gateway active so users can subscribe to paid plans.
Email Templates
Customize automated emails at Admin > Email Templates.
Available Templates
- Welcome Email: Sent when users register
- Password Reset: Password reset instructions
- Email Verification: Email address confirmation
- Subscription Confirmation: Sent after successful payment
- Subscription Canceled: Sent when subscription is canceled
- Build Completed: Notification when app build finishes
- Build Failed: Notification when build encounters error
- Credits Low: Warning when build credits are running low
Editing Templates
- Click Edit on any template
- Modify the subject line
- Edit the email body (HTML supported)
- Use variables for dynamic content:
{user_name}- User's full name{user_email}- User's email address{site_name}- Your site name{site_url}- Your site URL{app_name}- App name (where applicable){plan_name}- Subscription plan name
- Click Save Template
Resetting Templates
If you want to restore the default template, click Reset to Default. This will overwrite your custom changes.
Template Preview
Some templates include a preview feature. Click Preview to see how the email looks with sample data.
Tip: Keep email templates consistent with your brand colors and logo for a professional look.

Audit Logs & GDPR
Appy includes comprehensive GDPR compliance features including audit logging, data export, and account deletion management.
Viewing Audit Logs
Navigate to Admin > Audit Logs to view all tracked user activities. The audit log table displays:
- User: The affected user
- Actor: Who performed the action (admin or system)
- Action: Type of action (login, update, delete, export)
- Entity: The affected resource type and ID
- IP Address: Source IP address
- Timestamp: When the action occurred
Search and Filter
Use the search bar to find logs by user name, email, action type, or IP address. Filter by:
- Action Type: login, update, delete, export, consent_changed, etc.
- Date Range: Filter logs by start and end date
Logged Actions
The following actions are automatically logged for GDPR compliance:
| Action | Description |
|---|---|
login |
User login events |
update |
Profile or settings changes |
delete |
Resource deletion events |
export |
Data export requests |
consent_changed |
Privacy consent updates |
account_deletion_requested |
Account deletion initiation |
account_deletion_cancelled |
Deletion cancellation |
account_deleted |
Completed account deletion |
Data Export Requests
When users request data exports, you can monitor the status:
- Pending: Export queued for processing
- Processing: Currently generating ZIP file
- Completed: Ready for user download
- Expired: Download link has expired
Completed exports are automatically deleted after 7 days by the scheduled cleanup task.
Account Deletion Management
Account deletions have a configurable grace period (default: 7 days) during which users can cancel. After the grace period expires, the scheduled task permanently deletes the account.
GDPR Compliance: All GDPR-related settings can be configured in Admin > Settings under the GDPR tab, including data retention periods and grace period durations.
Data Retention
Configure how long data is retained before automatic cleanup:
- Audit Logs: Configurable retention period (default: 90 days)
- Data Exports: Automatically deleted 7 days after creation
- Build Artifacts: Configurable expiration period
© 2026 Titan Systems. All Rights Reserved.